Wednesday, March 31, 2010

Send and Receive Faxes Online – Free (or almost free)!

Faxes are becoming less essential in our lives as we can usually substitute scanned documents sent by email. Now and then, however, it’s useful or even necessary to send or receive a fax. There are a couple of low-cost (or free) solutions for this.

If your phone line is connected to your computer, then you can simply use the built-in fax services of you computer. However, that can be hard to set up. In any case, many of us no longer have working phone lines.

To send faxes, the service I like is FaxItNice. You can fax a document up to 10 pages long for $5. However, the better option is to sign up for the plan where you pay $20 up front, then pay only $0.18 per page whenever you want. Credits don’t expire. I’ve been using the service for 7 years and so far it has been quite stable and reliable. You just fill in name and number of the recipient, select a document you want to send (Word, text, PDF, images, and many other formats), and press the button to upload the document. You can preview the fax, add a cover sheet, then click to send. The service then sends the fax for you, redialing as needed until it gets through. You can try the system for free (one fax) here.

To receive faxes, which I need to do even less often than sending them, I use K7. It’s completely free. You just sign up to get a phone number which will then receive your faxes. When someone sends a fax, K7 will convert it to a fairly small image file and email it to you. You can also log in to view your faxes.

There are other services for sending and receiving faxes, but I haven’t found any better deals than these. Let me know if you have more suggestions.

Wednesday, March 10, 2010

Ushahidi to map conflict in Jos, Nigeria

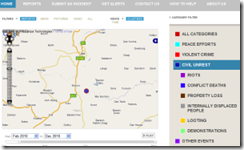
temp I’ve been interested in Ushahidi for some time now but had never gotten around to installing it. If you haven’t heard of it yet, Ushahidi is a web-based, community-oriented tool for mapping events. It has been used for tracking civil unrest, events related to the recent earthquakes in Chile and Haiti, and so on.

I finally did set up a test installation a few weeks ago, just in time for the latest outbreak of violence around Jos. You can see it at here. The killings this week were south of Jos. I still have not figured out how to connect email to the Ushahidi server, so it is not receiving alerts or sending them out. Also, there is no mobile phone connection so it’s not receiving text alerts. Anyone who wants to help set these up would be welcome.

I have also set up a news feed to gather from many sources news stories related to the conflict centered in Jos. I’ve used Yahoo Pipes to pull in the headlines from CNN, Reuters, al Jazeera, AllAfrica.com, and so on, then extracted the ones dealing with the Jos situation. You can view the stories or use the (RSS) news feed to put the headlines into your favorite news viewer such as Google Reader.

Thursday, January 14, 2010

Trying out Free Smilebox – Flash Presentations from Your Photos and Videos

smilebox screenshot cropped I got an email from a friend today containing a family slideshow made at Smilebox. If you're not familiar with that site, it's an easy way to use your photos and videos to create a slideshow you can then email or post. The show is a self-contained Flash presentation that plays in any browser.

Since I just used Smilebox myself to make a little picture show, I thought might save you some time if I tell you more before you try it yourself. The most important point is that once you’ve assembled your show, you can’t change the style. Don’t spend a lot of time designing your show before you are sure which style you want to use.

The summary is that Smilebox is a good tool for a quick, simple slideshow. The results look professional. It probably isn’t the tool you want to use for your most important presentations both because it is inflexible.

I’ve created some samples with a few styles. They’re 2-8 MB each. See at

The Good

  • There is a free version.
  • You can email your show, post it on Facebook or a blog, etc.
  • There are many styles to choose from, from simple slideshows to “books” with interactive zooming to greeting cards and notes.

Limitations

  • You need a reasonably good Internet connection to use this (not an issue in developed world).
  • Each style has its own methods for you to arrange and caption the photos. You have to experiment and learn each one. For example, the “Slide” style has a sorter view where you can drag and drop photos to reorder them, but most styles don’t. You may enter captions directly on the photo in some cases, or on the page in others, or have to click the enlarge button first.

Limitations on Free Version

For $3.00 you can avoid the following restrictions on a single presentation. You can also pay $6 per month or $40 per year to have the full version.
  • Supported by ads. As usual, you can’t know what ads might appear alongside your show.
  • Each style has its own music. You typically get three choices with each style. With the paid version, you can choose from hundreds of pieces of stock music or use your own.
  • The full version can play full-screen.

The Bad

  • The program does not use titles, captions, descriptions and so on that you may have already embedded in your pictures. You have to enter all captions whenever you start a new project.
  • Once you’ve committed to a style, you can’t change it without starting over. That is, you can choose a different style, but then you have to arrange and caption your photos all over again.
  • The styles are fixed in stone. That is, there is nothing you can modify, not fonts, position on page, layout of a given page, and so on. Of course, this is part of the reason that the program is simple.
  • The interface is rather slow. I think all the whole thing is written in Flash.
Let me know if you try it and have any further observations or comments.

Saturday, July 4, 2009

Create a high-security vault for your data in 5 minutes

truecrypt_iconIn the last article, Protecting your sensitive data with TrueCrypt, I gave an overview of what Truecrypt can do for you: make an encrypted virtual hard drive, encrypt an entire partition, or encrypt an entire hard drive. This time, we'll see how to make the virtual hard drive in at most 5 minutes. Rather than write my own tutorial, I direct you to the step-by-step TrueCrypt Beginner's Tutorial with full screen shots.

Instead of another tutorial, I'll summarize the steps, add a note or two, and try to give a little more explanation of what is happening in this method.

Why use TrueCrypt?

First, why use Truecrypt rather than one of the many, many other encryption programs?

  • Compatibility: TrueCrypt runs on Microsoft systems from Windows 2000 upward, on Mac OS X 10.4 and 10.5, and on Linux. (According to this Wikipedia article, only one of the other 45 disk encryption programs work on all three systems, and that one is not open source).
  • Price: Free. Not shareware, not trial-ware, not "free download," but just free, period.
  • Open source: This means that anyone can examine the program's instructions to see how it all works. This means that many people can be working on improvements and bug-fixing. More importantly, though, the transparency of open source makes it hard for any security flaws to remain undetected.
  • Wide use. TrueCrypt is one of the most widely used encryption programs. The site reports over 10 million downloads to date.

That said, the most important thing is to protect your sensitive data somehow and to use a well-supported, respected encryption program. If you like experimenting, there are many programs out there. TrueCrypt can be a complicated program with all kinds of options, but it's quite easy to use the most important features.

Overview

Goal
banksafe What will you accomplish when you follow the tutorial?

  • Within a few minutes, you will have a new "drive" M: on your computer where you can safely store sensitive information. You can use it like any other drive--create files, drag-and-drop files into our out of folders on the drive, even use a folder on the drive as your "My Documents" if you like.
  • Though in action you see a new drive M:, all the data is kept in a container file that can only be unlocked ("mounted") using TrueCrypt and your passphrase.
  • While your new drive is mounted, you will not know or care that your files are encrypted. When you turn off your computer or lock ("dismount") the drive, the data will be invisible, safe from any prying eyes.
  • You can copy or move the entire encrypted drive, as a single file, to a different location such as a USB flash drive or another computer. This is good for backup.

Steps

Here's a high-level explanation of the 18 steps in the tutorial.

  • Step 1: Download and install the program.
  • Steps 2-12: Create the container file. This only has to be done once.
  • Steps 13-18: Mount the container file for use. You do this every time you want to unlock and access your data.

Precautions

  • You are making a data vault or safe, and your passphrase is the combination to the lock. There is no backup, no spare key or emergency button to use to recover your data if you lose or forget your passphrase. In most cases, it is probably best to record your passphrase somewhere safe rather then rely on your memory. Obviously, you don't want to keep it somewhere where a thief will see it, such as in your computer bag. Depending on your situation, you may not even want to keep it in writing in your home or office, but do consider keeping it somewhere.
  • Putting your information onto an encrypted drive is only one part of security. Do not neglect other parts; a chain is as strong as its weakest link.

OK, let's do it

Now, go to the tutorial and follow it step by step, referring to these notes as you do.

  • Step 1. Downloading and installing TrueCrypt. Ideally, you should download the program directly from TrueCrypt so that you get the most up-to-date, "pure" version.
  • Steps 2-5. Telling TrueCrypt you want to create a virtual drive. Just click the buttons as shown, no choices to make here.
  • Step 6. Specify location and name of container file. Attention: be sure to read the explanation in the tutorial. Although it might appear that you are to select an existing file to encrypt, this is not true. Rather you are giving the program the location and name of a file to create. This new file will be the "container" for your virtual drive. If you select an existing file, it will be erased, not encrypted!
  • Steps 7-8. Having chosen a name for your container file, you just press "next" two times.
  • Step 9. Tell TrueCrypt how big to make your virtual drive, how much data you will be able to store in it. TrueCrypt will create a container file of this size, so you will need at least that much free space in the location you have chosen. Don't make it too big if you plan to copy the entire thing onto a flash drive.
    Optional note: If you choose to make the container "dynamic" (Step 11), it is very small at first and only grows as you add files. In this case, the size you select in step 9 is the maximum size. If you do not make the container dynamic, then the container file will be this maximum size from the very beginning, even though it contains no data.
  • Step 10. Choosing a passphrase. While you are just testing, you can use a simple passphrase. For serious use, however, be sure to read the guidelines about how to make a secure passphrase.
  • Step 11. Select format type. Just follow the instructions, moving your mouse around randomly for a while to help make the encryption strong, then click Format.
    Optional note: For advanced use, you can use a format other than the default FAT. For large virtual drives in Windows, you might consider using NTFS.
  • Step 12. Finishing up. Now the container file is ready to use.
  • Steps 13-18. Mounting the container as a virtual hard drive. Although this occupies six steps in the tutorial, it is really simple. First, you choose a drive letter to assign to the new drive (step 13), then you tell TrueCrypt which container file to use (i.e., the one you just created) (steps 14-16). Finally, you enter your passphrase for that container file and mount it (steps 17-18).

At this point, your new drive M: is ready to use just like any other drive. Remember that you data is exposed as long as the drive is mounted; if someone steals the computer while you are working on it, M: will be unlocked until the computer is shut down. Depending on the situation, you may want to manually dismount it when you leave the computer or when you do not need to access the secure files.

Finally, read the small print at the end of the tutorial and realize that your original, unencrypted data is still present on your original drive even after you delete it--that's why file-recovery programs work. To permanently remove it, you need to use a disk wiping program with the option of erasing all unused disk space. See Purge Your Hard Drive for a good explanation. One wiping program is Heidi Computer's Eraser. Some others are reviewed in Best Free Secure Erase Utility.

Even then, how do you know that you have deleted all the files that contain sensitive data? What about backups, email folders, temporary files, obscure files in the Application Data folder, the paging and hibernation files? You really don't know. That's where whole disk encryption comes into play. It may seem a little scarier to think of altering your whole hard drive, but it's actually easier than making a virtual drive, and it eliminates all these residues of the information you want to protect. You will not need to worry about wiping or shredding your files, either. I'll cover whole disk encryption next time, in a much shorter article I hope!

Photo of safe by rpongsaj on Flickr, http://www.flickr.com/photos/pong/ / CC BY 2.0

Protecting your sensitive data with TrueCrypt

About two weeks ago, I finally took the big plunge and encrypted my laptop's entire hard drive. I knew in theory that it was a good security precaution, and in fact, our mission's IT policy requires hard drive encryption on all laptops. It's a policy that is still more honored in the breech than in practice. Why didn't I do it earlier?

Not that I've been totally slack about protecting my data. I've always kept my passwords and financial accounts encrypted. (Always? What about those home accounting programs--I know my Microsoft Money program opens without a password....) I don't think there is any sensitive information in my email folders, except that anyone successfully logging on to the computer could get enough information about me and my contacts to start lots of scams even without actually breaking into my email server. ("This is Pastor Jonah, friend of Mike, who you support. He's been in a bad accident and needs money for treatment. Please urgently send $1000 to this account number ...") The bottom line is that any unencrypted information on my computer is potentially exposed to anyone who steals or borrows my laptop.

But since I have a good password for even logging on to my laptop, no one should even get that far, right? Wrong. It's very easy to break into a Windows computer if you have physical access to it. Anyway, if the data is not encrypted, someone can take out the hard drive and read it on another operating system.

Last year, I finally installed TrueCrypt, an excellent, free encryption tool. TrueCrypt can work in three main ways:

  • Create an encrypted virtual hard drive. Tell TrueCrypt where to put the file to contain the data, assign a pass phrase, and TrueCrypt creates new, encrypted volume ("hard drive") for you with the drive letter you choose, such as "T:". From then on, you can use it exactly like any other drive. As long as the volume is unlocked with your pass phrase, you can't even tell that the data is encrypted. Lock it again and the drive letter disappears, leaving only what looks like a file of random garbage.
  • Encrypt a partition. Most hard drives these days are divided into different logical areas or partitions, each with its own drive letter ("C drive," "D drive," etc.). TrueCrypt encrypts all the data in the entire partition, making it inaccessible until you supply the pass phrase. This option allows you to keep some data unprotected and more sensitive data encrypted on a separate partition. Unless you encrypt the operating system partition (usually C: in Windows), you can still boot the computer without the password.
  • Encrypt an entire drive. In this case, everything on the drive is encrypted and nothing can be accessed without the pass phrase. Nothing, that is, except the tiny boot program that loads enough TrueCrypt to get your password and unlock the drive for you. If you lose your pass phrase, there is no way you're going boot your system or recover your data, period.

Rather than encrypting my whole drive, I started with the first option--a virtual hard drive where I could keep my sensitive data. Next time I'll show just how easy it was.

Monday, June 1, 2009

How we use FrontlineSMS

Jos, Nigeria has been in the news recently because of riots in November that killed hundreds of people. This was the second such episode since 2001, and the situation remains tense. Besides this, violent crime has increased rapidly in the past 4 years, with frequent robberies by armed gangs of up to 20 or more men.

tempPart of our response as a group of missions in Jos has been to strengthen our communications network, and FrontlineSMS has become a key part of that network. The mobile phone is the basic means of communication in Jos, where there are few if any functioning land lines, and where Internet access is still expensive and spotty. During the November crisis, we noticed that voice calls on the mobile network rarely connected, probably because of congestion, while SMS messages got through well.

With FrontlineSMS, we have so far developed a system with these features:

  • Anyone can text the system and receive a response with the current status message. In a crisis, this could contain warnings, instructions, announcements and so on.
  • Besides this "on demand" capability, we keep one list of users ("text alerts") who receive broadcast alerts.
  • Anyone can join the "text alerts" group by sending the request as a text message to the system. We ask people to send the message ".join " followed by their name. At this point, FrontlineSMS cannot automatically include the name when the phone number is added to a group, but we hope that could be added in the future.
  • We maintain other user lists such as compound security leaders, crisis management team, and so on. Anyone can broadcast a message to the crisis management team by prefixing a text message with a code that causes FrontlineSMS to forward the message to team members.
  • The system sends outgoing SMS message through the Internet when it is available. They're sent to the Clickatell, which routes them to the actual SMS network. Clickatell is is very fast and inexpensive. We can send about 80 messages per minute this way, far more than is currently possible if we were to send messages directly onto the mobile phone network.
  • FrontlineSMS is compatible with many mobile phones and modems. We are using a Huawei E170 modem.

    Real Life Examples

    Fortunately, we have not had actual rioting since we set up the system. However, there have been times when it has been very useful to send warnings and to raise the alert level. Here are some actual examples:

    @Alerts: Jos is tense, please avoid downtown today.

    @Security: X and Y have been robbed tonight & report the robbers took their Toyota Land cruiser and muttered something about Hillcrest on the way out.

    @Alerts 20Feb 655pm. Serious rioting reported in Bauchi. No problems in Jos. Obey curfew, avoid areas that could be troublesome.

    22 Feb 8am. *** Rioting on Friday Bauchi, churches & mosques burned. Now controlled. Keep on alert. Report signif news this num or ur security rep.

    SecGrp: Some rumors are going around about unrest planned for Friday, .... Email or txt me if you know more. --Mike

    Effectiveness

    The system has worked quite well. The most serious limitations have been

    • The interfaces (modem and Internet) have had a tendency to lock up, failing to receive messages, and have to be re-initialized manually.
    • Message delivery is sometimes delayed for hours, occasionally more than a day. This is a fault of the local network and has nothing to do with FrontlineSMS or Clickatell.

    Summary

    FrontlineSMS has served us very well as a well to communicate quickly by SMS. We would recommend it for others in similar situations.

    Tuesday, May 26, 2009

    Using WSUS to save bandwidth, and how to set up an XP Home edition computer to use it

    Two of the biggest challenges in keeping computers running in Africa are power and bandwidth. Bandwidth as in connection to the Internet, which is now vital for many of us. We're constantly trying to control and limit our bandwidth usage, which gets harder as people have higher and higher expectations. Our old-timers remember when we had to pay $0.50 a page to get emails that were sent over a noisy transatlantic phone connection to an expensive, 19 kbps Zyxel modem. Newcomers from developed countries are used to streaming video, Skype phone calls, file-sharing and so on.

    One of the hidden consumers of bandwidth, though, is program updates. Keeping programs up to date is critical for security, but can consume a lot of bandwidth. For example, our network at SIM Nigeria serves roughly 40 computers (including laptops members bring to the office just to connect to the Internet). If a set of Windows updates is released that comes to just 10 MB, that translates to 400 MB to update all 40 computers, which is close to a whole day's bandwidth allocation for us.

    Part of the solution is to use Windows Server Update Services (WSUS). This lets you download Microsoft updates onto a server on your network from which all your other computers can access them. Each update is downloaded once for the whole network, rather than once for each computer. You can read about WSUS and how to set it up here on the Microsoft Technical network.

    An issue I encountered when trying to get as many computers as possible to use WSUS, though, is that XP Home (as opposed to Pro) edition does not include the policy-setting tool (gpedit.msc) normally used to instruct computers to get updates from the local WSUS server rather than over the Internet from Microsoft. Nor can you simply copy gpedit.msc from another computer onto the XP Home computer.

    Instead, you can use a simple script to add some keys to the XP Home computer's registry. The script and explanation can be found at Guide For Setting Up XP Home Clients With WSUS. Just create a new text file, enter "REGEDIT4" as the first line, and copy and paste the registry keys as shown in that page. Change the two occurrences of "http://yourWSUS" to reflect the URL of your WSUS server. Save the file as "WSUS4XPHome.reg" (or whatever.reg) and run it on the XP Home machine. I think a simple reboot will suffice to start it looking for updates in the new location, but the page above tells how to use some commands to start the process immediately and without rebooting.

    Reversing the process

    You definitely do not want to leave these settings on a computer once it is no longer using your network for updates, since it will then fail to be updated at all. For computers joined to a domain that sets the group policy to use WSUS, it should be enough to remove them from the domain. For computers you manually changed (via local policy or registry changes) , you will have to undo those changes. As far as I know, you can simply delete the entire [HKEY_LOCAL_MACHINE\SOFTWARE\Policies\Microsoft\Windows\WindowsUpdate] key as it does not appear to exist in the default installation.

    If anyone has corrections or further information, I would love to know.